- French braids and bun
- Volumetric braid
- Ponytail
- Double tail
- High harness tail
- Instructions
- Side Dutch braids
- Instructions
- Dutch braid ponytails
- Instructions
- Lateral boxing braids
- Instructions
- Tight knot
- Instructions
- Leveled tail with segments
- Instruction (option 1)
- Instruction (option 2)
- Sloppy side bunches
- Instructions
- Fantastic bundle
- Spikelet without weaving
- Double hairstyle
- Beautiful bunch
- Hairstyle with elastic bands
- Mickey Mouse ears
- Fish tail
- Vitushki
- Cascade
- Twisted tail
- Ponytail from opposite braids
- Pigtailed tail
- Harnesses at the back of the head
- Bundle of braids
- Openwork bundle of braids
- Side spikelet with a bunch
- Beautiful hairstyle of 4 braids
- "Snail"
- Ponytail with plaits
- Classic knot
- Greek bunch
- Greek hairstyles
- Front braid hairstyle
- French braid
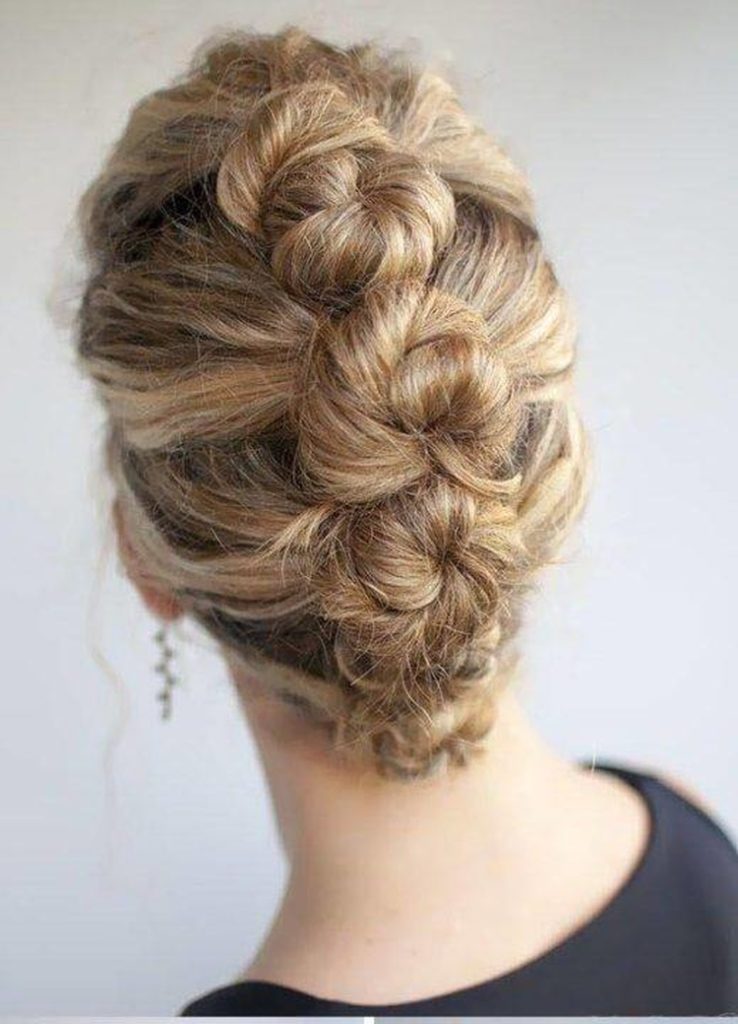
French braids and bun
First of all, apply a smoothing agent - the less frizz, the easier it is to braid neat braids.
- Divide your hair into two parts, pin the upper part for the duration of braiding.
- Once again, strip the hair from the bottom into several parts, and braid three "French" spikelets.
- Having reached the middle, connect the braids with the rest of the hair and twist a tight tourniquet or a voluminous bun, as you like.
- Finish off with a couple of polishes to help keep the hairstyle in place.
Of course, weaving braids from behind is quite problematic, so take your friend, mother or sister as your helpers.
But this styling can be "turned over", if there is no one "at hand", braid the braids on top, and then twist the rest of the hair into a bundle at the base and stab it with invisible ones.

Volumetric braid
The hairstyle is suitable for obstinate thick and long hair that always does not fit and stick out in different directions.
If hair lacks volume, use a small amount of mousse marked "volume" before styling.
- Separate some of the hair at the back of your head and start braiding, taking the strands from the side from the remaining mass of hair.
- To get the so-called "fish" braid, these same strands must be tucked inward, under the braid, and not thrown upward, as in classic weaving.
- At the end, fluff up the braid a little, gently pull the pigtail in different directions, so you will make it even more voluminous.
If your hair is naturally straight, put it on a styler before braiding, so the braid will hold on tightly. Oh, and don't forget to use a heat protectant to keep your curls from getting damaged.

Ponytail
Braid the "French" braid on the right or left, as you prefer, secure it with an elastic band to match your hair, and then pull your hair into a ponytail. It is better not to raise your hair high, otherwise the pigtail will puff up.
Fluff up the tail - apply volume. Hairstyle is ready 🙂

Double tail
- Take two small strands on the sides, connect and secure with an elastic band.
- Do not make a tight tail, because now you will need to turn it inward.
- Next, take the hair on the sides again, connect, twist and braid the pigtail.
- Apply texturizing spray to the remaining hair.

High harness tail
The advantages of this hairstyle are obvious: the hair does not interfere, does not get tousled and looks neat.
Instructions
- 1) Pull your hair into a high ponytail, smoothing it well.
- 2) Divide the tail into two halves.
- 3) Twist half of the ponytail into a tourniquet and secure with a hairpin.
- 4) We also twist the second half of the tail into a tourniquet (in the same direction).
- 5) We connect both halves by twisting them into one bundle.
Advice: in the last paragraph, you need to twist the hair in the opposite direction in relation to the twist of the first bundles. That is, if you twisted the two halves from left to right, then you need to connect them by twisting from right to left.

Side Dutch braids
I have terribly unruly hair, which tends to fluff and curl at the slightest sweat. Tight Dutch braids, braided from the sides, help to calm the hair.
Instructions
- 1) Comb your hair and part it in half, making a center part.
- 2) Make your first Dutch braid. To do this, divide your hair into 3 strands and braid, winding them under each other and adding new curls from the sides of the strands.
- 3) Braid the second braid.

Dutch braid ponytails
No time to braid your braids to the end? Make ponytails out of them!
Instructions
- 1) We begin to braid back braids (see point 2) to the level of the neck.
- 2) Tie loose curls with an elastic band and comb, forming ponytails.

Lateral boxing braids
An unusually fashionable style among lovers of not only boxing, but also other active sports.
Instructions
- 1) Comb your hair and divide into several equal partings.
- 2) Braid the first half of your hair in a boxing braid style. To do this, weave a Dutch (reverse French) braid with strands.
- 3) Braid the rest of the braids.
Advice: so that the braids come out as close as possible to the head, the strands should be picked up closer to the parting, moving along it.

Tight knot
A simple hairstyle is created in a minute. However, do not roll your hair into a tight knot too often, as this can damage the roots and cause scalp pain.
Instructions
- 1) Tie a high ponytail and secure the base with an elastic band.
- 2) Wrap the loose part of the ponytail around the elastic at the base and secure with a second elastic or hairpins.

Leveled tail with segments
A comfortable hairstyle will allow you to engage in even the most active exercises without fear of tousling your hair.
Instruction (option 1)
- 1) Tie a high ponytail, securing the base.
- 2) After indenting, tie your hair with an elastic band.
- 3) Make another indent and tie with an elastic band. Continue along the length of the hair to the end.
Advice: the hairstyle can be made more persistent using grabs, as in the second option.
Instruction (option 2)
- 1) Make a malvinka, secured with an elastic band.
- 2) Make an indent, pick up the side curls and make another malvinka. 3) Continue creating segments until you have a tail.

Sloppy side bunches
Delicate hairstyle looks playful, resembling cat ears.
Instructions
- 1) Comb and part your hair into two halves with a center part.
- 2) Form two high ponytails, securing the bases with elastic bands.
- 3) Wrap loose curls around the base and secure.

Fantastic bundle
To begin with, it is worth separating a strand in the form of a rectangle in the parietal zone. Then divide it into three equal parts. All parts should be as straight as possible to get a beautiful hairstyle. After that, we begin to weave a braid with a catch, alternately weaving strands from the left, then from the left side. Use beautiful, bright elastic bands for such a hairstyle. We fix each segment with an elastic band, as in the photo.
When the braid is ready, use a soft elastic band to make a donut and braid the braid around it. We fasten the braid with invisibility.

A beautiful and unusual bunch is ready.
Spikelet without weaving
To begin with, we tie small tails along the entire length of the hair, there should be about five of them, depending on the length of the hair. We form each ponytail into a bundle and attach them to the elastic bands that secure our tails. For beauty, you can decorate your hair with hairpins with flowers or other decorations.
Double hairstyle
In such a hairstyle, two hairstyles are intertwined at once. One of them is a braid, the other is a regular tail. To begin with, you should comb your hair well and divide it across into two equal parts. Then divide the second lower part into two and braid one of them with an ordinary spikelet, only towards the back.
But the second part of the hair should be braided with a spikelet only in the direction from the neck to the crown. Lock where the two braids merge, and then add a smooth combed third section to them.

Beautiful bunch
The hair is collected in a high ponytail and then secured at the base with an elastic band. After that, divide the loose hair into two parts and twist each into a bundle. After that, twist the flagella together, which ultimately forms the look of the braid.
Then form a bundle from the braid, laying it in rings and fixing it with invisible ones.

Hairstyle with elastic bands
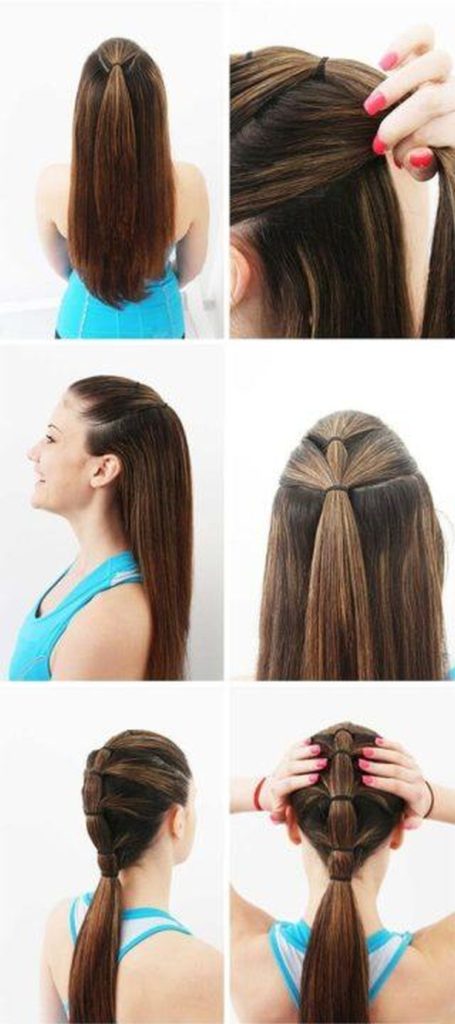
The hair needs to be combed, then in the parietal region, select a part of the hair and secure it with an elastic band. After that, lift our fixed strand and collect the second layer of hair under it and secure it with an elastic band connecting it with the upper tail. So we continue to do along the entire length of the hair.
Mickey Mouse ears
The hair must be parted vertically, and then using a soft bagel elastic, twist the ponytails into two bundles, like Mickey Mouse ears. To do this, the hair must be wrapped around the elastic itself, and fixed at the base of the hair.

Fish tail
- For a successful hairstyle, the hair must be combed carefully.
- Then, in the parietal zone, you need to take a triangular strand.

- Divide it into three strands, and then start to weave a regular braid. Then we take a strand from the side and shift it to the middle of our two strands. This will connect it to the left side.

- We continue to weave the braid, only already taking the strand from the other side, and having thrown it in the middle, it connects to the right strand. After that, a pick-up is made and woven into the braid.
- Thus, weave a braid, making hooks, and fix the tip of the pigtail with an elastic band.

Vitushki
This hairstyle is more suitable for a little student. Although high school students can add childish spontaneity to their image.
- Part your hair into two equal parts. The parting can be not only straight, but also zigzag.
- Collect each piece into a high or low ponytail.
- Twist each tail into a plait.
- Twist the harness around the elastic bands.
- Secure the ends with invisible or bright rubber bands. You can decorate the top with ribbons.

Cascade
Tails in several tiers look interesting and neat. This hairstyle can be worn to school at any age. True, it is not suitable for short hair. At the temples, the strands will be knocked out and spoil the overall shape.
- Comb all your hair to the side.
- Separate two strands from above: one from the side of the crown, the other from the side of the forehead.
- Tie the strands into a ponytail with a narrow elastic band.
- Twist the ponytail through the space above the elastic.
- Gather two more strands on the sides.
- Tie them into a ponytail using a thin elastic band, grabbing the hair from the top tier.
- Twist the ponytail through the space above the elastic.
- Repeat steps 5-7 one more time.
- If necessary, straighten the twisted strands a little.
Twisted tail
The fastest way to braid long hair for school is with a ponytail. It can be performed in various techniques that diversify the hairstyle and make it possible to look in a new way every time, without making significant efforts.
An example of how to make a romantic and elegant styling out of a banal tail is to turn it out.
All you need to create it is a little styling product that will make your hair more manageable, and a hair tie.

It is better to do this hairstyle low, at the very neck.
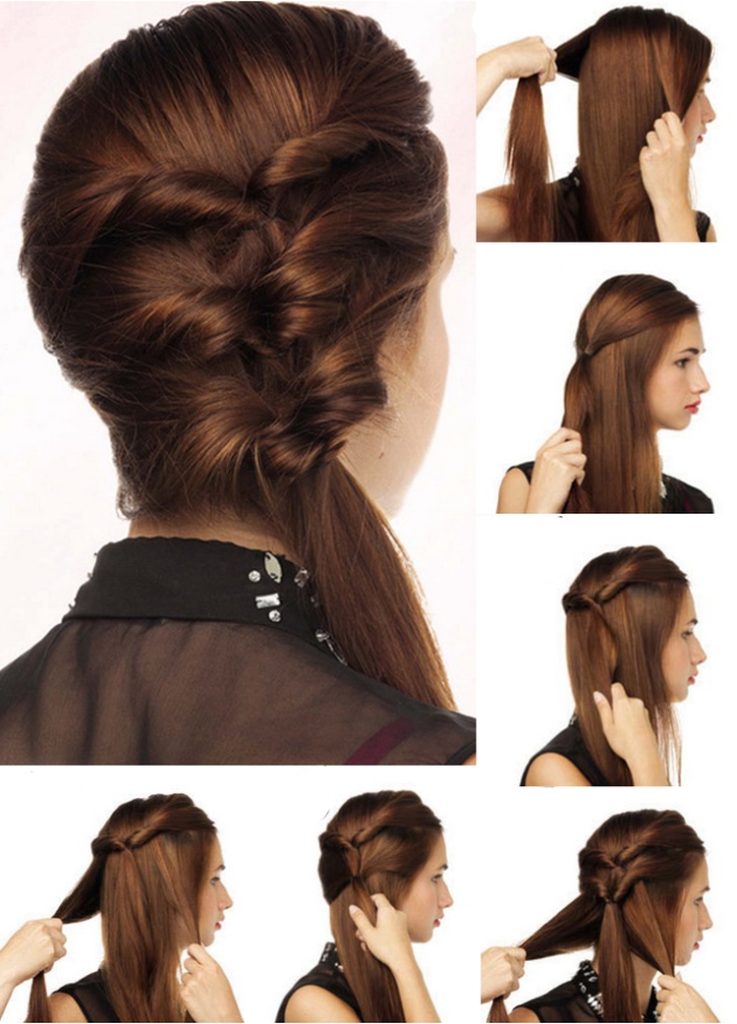
It is necessary to tie a regular ponytail, secured with an elastic band, thread the tail, moving from bottom to top, into the hole between two equal parts of the hair above the elastic. To make this easier, the tail can be pre-twisted with a tourniquet.
Ponytail from opposite braids
The original way to braid the ponytail is to pre-weave the braids.

To do this, you must observe the following sequence of actions:
- Divide the head with a side parting (from ear to ear).
- Secure the lower part of the hair with an elastic band or a clip.
- Start braiding a French braid at the base of your hair.
- Having reached the parting, fix it.
- The second braid is woven towards the first, from the neck to the back of the head.
- You can do this braid in reverse weave.
- Loose hair remaining from braiding, secure with an elastic band at the back of the head.
Pigtailed tail
There are several ways to diversify the tail with a braid:
- Make a high ponytail, which is then braided into a braid.
- Create a ponytail where only one curl is braided.
- Wrap the base of the tail obliquely, thereby hiding the rubber band.
- A more complex weaving option is a spiral braid around the tail.
- The schoolgirl will not be able to do this hairstyle on her own; she will need the help of her mother or friend.

A step-by-step instruction for performing a hairstyle looks like this:
- Tie a high ponytail.
- Separate three strands from it on the side.
- Weave them together 2-3 times.
- Next, you need to weave the braid diagonally, picking up new strands only from the upper side of the tail.
- At the desired height, wrap the entire tail obliquely and continue to weave the next section parallel to the first.
- Thus, you need to continue doing the braids to the ends of the hair. Then secure the hairstyle with an elastic band.
Harnesses at the back of the head
This will only work on long hair.

To create it you need:
- take a lock of hair from the temple;
- twist it with a tight tourniquet and transfer it to the other side;
- tie the resulting tourniquet in a knot with a curl on the opposite side of the head;
- twist both strands again and transfer to the opposite part of the hair, where to connect the tourniquet with a new strand;
- continue to weave to the desired length.
Bundle of braids

The bundle can be made not only from curls twisted into a tourniquet, but also from braids. This hairstyle looks elegant and beautiful. You can repeat styling in 5 minutes on both medium and long hair.
- We start by creating a high ponytail.
- Divide the shock in half. We will braid one half. Start braiding, stepping back from the beginning of the tail for a part from the entire length of the hair.
- Braid the second braid in the same way.
- Around the tail, we first lay out one braid along the axis, fixing with hairpins, and then the second. An easy and quick hairstyle for school for every day is ready.
Openwork bundle of braids

A bun made of a braid, braided using the fishtail technique, turns out to be graceful and incredibly beautiful. The hairstyle will suit both young schoolgirls and teenagers. With such styling, you can safely go even to a youth party. Ovation and envious glances of girlfriends are guaranteed.
We fasten the hair in a ponytail at the top of the head. The higher it gets, the more spectacular the hairstyle for every day.
- Using the fishtail technique, we braid the braid. During the process, try not to tighten the strands very much. Put an elastic band on the tip of the braid.
- Stretch the weaves, giving them delicacy and splendor.
- Lay out the braid around the base of the ponytail, making a bun. Hairpins will help fix a light hairstyle. Straighten the strands, giving the beam an unobtrusive disheveledness. The hairstyle for school is ready. And it took only 10 minutes to complete it.
Side spikelet with a bunch

A hairstyle for school, made with a side spikelet and a bun, looks beautiful and interesting. With this styling of curls, the girl will be comfortable. Of course, my mother's efforts will be noticed. Everyone who sees the hairstyle will surely express words of admiration. It takes about 10 minutes. You can decorate the styling with hairpins, hairpins with bows and flowers.
- Let's separate the hair with a crescent, make an arched clear parting. For now, we will fasten the bulk of the hair with an elastic band, and begin to work with the side curls.
- We braid the side strands, starting from the middle of the forehead (you can move a little to the side), in a half-string, adding only curls from the outside. Having finished to the center of the crown, we fasten the tip.
- We will make the main shock in the form of a tail, strictly in the center of the head.
- Now you need to braid the central three-strand regular braid. Divide the tail into two curls.
- The third strand will be the ends of the braided side braid.
- In principle, the braid can be left as it is. But it will turn out more beautiful if it is twisted into a bun and decorated with some kind of accessory.
Beautiful hairstyle of 4 braids

It will take about half an hour to complete this hairstyle. But the effect is amazing.The head looks neat, the hair does not knock out, does not tangle, does not stick out anywhere.
- First, separate the hair in half, making an even vertical parting. For convenience, we will fasten one half with clamps. Divide the second half in half, too. We temporarily fasten the lower part with an elastic band so that it does not interfere and does not get confused.
- We begin to weave the upper part of the hair with a half-strip.
- We add side strands only on one side to each weave. We braid to the back of the head with a half-string, and then we move on to the classic braid. We fasten the ends.
- We perform a similar braid on the other side.
- We also braid the remaining side curls, only with a spikelet. You should get 4 braids.
- Twist the two side braids and fasten them at the bottom.
- Now we connect, also twisting, both weaves to make a tight tourniquet. As he twists it, he himself will lay out in the desired shape of the hairstyle and lie down. It remains only to fix the styling with hairpins, hide the elastic under the hairstyle, and release the ends from under the weaving.
"Snail"

A spectacular and fashionable hairstyle called "snail" will take some skill and time. A little fashionista can be sure that no one else will have such a spectacular hairstyle (especially if it is decorated with something). At the same time, it lasts for a very long time and does not unravel.
- Separate a small "circle" of hair at the crown of your head. You don't need to take care of the partings - a little later they will be hidden under the pigtail.
- Having separated about a quarter of the hair from the ponytail, begin to weave the pigtail evenly braiding the strands from the outside.
- The weaver must constantly move around the model, slightly ahead of his hands, then the pigtail will lie in even rings.
- The end of the braid can be secured with an elastic band (the smaller the better), and hidden under the previous weaving circles.
This hairstyle is suitable for every day and for the holidays, because it is very easy to decorate it with a ribbon, beads, or small decorative "crabs"
Ponytail with plaits

It is done very simply - the hair is smeared with an indelible balm, then lifted into a ponytail and divided into two wide strands. Both strands are twisted into a bundle, and then intertwined. The end is seized with an elastic band and secured with a hairpin at the base.
Simple, fast, and doesn't get in the way during the day.
Classic knot
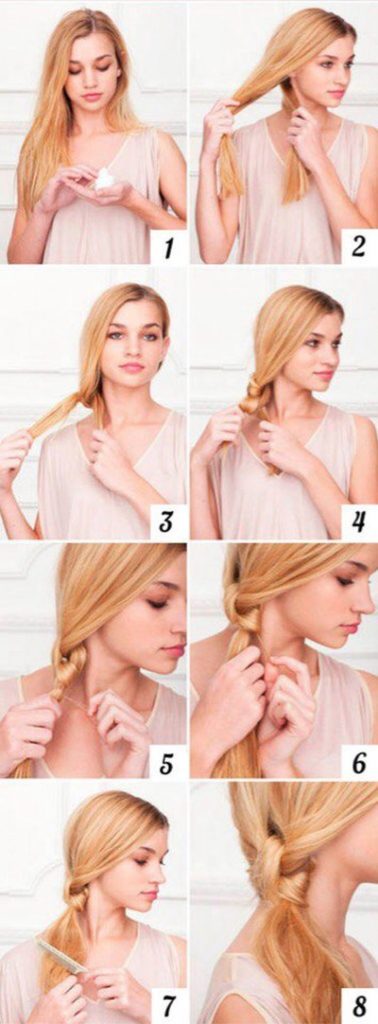
For this installation, a maximum of two minutes will be sufficient. We divide the hair into two partings: upper and lower. Our ponytail will be on the side. We tie the pieces into a knot, so 3 times. You can leave it that way, or you can do it until you run out of hair. Then tie with an elastic band.
If you want to look unusual and colorful, you can add a ribbon to the braiding and attach it to your hair from the very beginning.
Greek bunch
You can use a slightly simplified version of creating a pretty bundle. For this we use the Greek technique. Some girls are convinced that this kind of hairstyle is created only by a professional hand, but this is not the case.
With the help of the wizard, you can create more complex variations, and the bundle can be done by yourself at home.
For the result to be successful, the hair length should be just below the shoulders. The tuft will be located at the back of the head. Therefore, first we make a low tail. Then, pushing the elastic from the back of the head, we scroll part of the hair through the hole. We fix the ends in the so-called pocket.
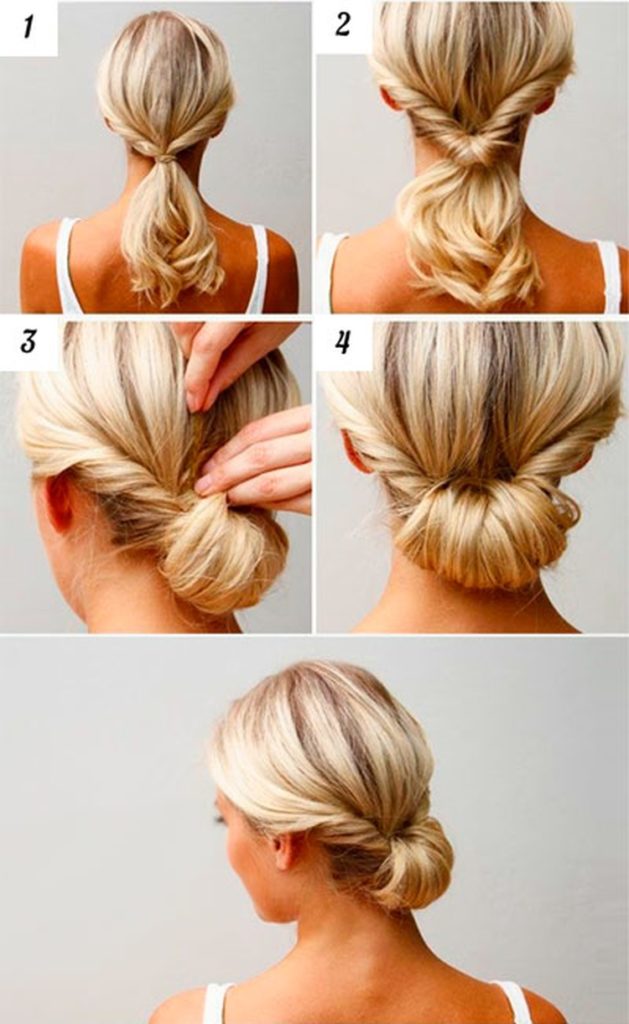
If you manage to allocate more time for your hair, you can add complexity. At the beginning, turn the side zones either into pigtails or into bundles.
Greek hairstyles
Sophisticated Greek hairstyles are popular for weddings and other celebrations, but why not do something similar for school? Moreover, in a simplified version, it will not take more than 5 minutes. As a rule, such hairstyles are distinguished by the absence of any clear lines and symmetry - in the everyday version, they may well be slightly sloppy.
The main part is a braid woven in front, which frames the head and can go, for example, into an ordinary tail.

Front braid hairstyle
The principle is the same as that of the Greek, but this hairstyle is good because the hair is completely gathered (not all school rules allow freedom in the form of loose hair). In addition, for this romantic hairstyle, you can use laconic decor in the form of, for example, discreet hairpins in the form of flowers.

In order to style your hair in this way, you must:
- Divide them into two parts, equal in volume.
- From one half we weave an ordinary spikelet braid, without pulling the strands.
- We do the same with the second half, but the strands should be more tightly intertwined with each other, and the result should be a tight braid.
- The matter remains small: we simply raise the braids up (the one that is denser is closer to the forehead, the looser one is behind it), framing the head with them.
- We fix it on the sides with invisible ones. The hairstyle is ready!
French braid
This hairstyle is known to everyone and everyone, but at first glance it seems that it is too complicated and will take a long time. This opinion is wrong: after spending just 5 minutes of time, you can get a gorgeous hairstyle that will last all day.

As you can see, hairstyles for school will never emphasize status, but they will always remind others of the wonderful age of their owner. Their ease of implementation will help you to be at your best even when there are 5 minutes left before the exit.
